WARNING: This product contains nicotine. Nicotine is an addictive chemical.
WARNING: This product contains nicotine. Nicotine is an addictive chemical.
NEWSLETTER
Get special offers and find out what's new in the store. Sign up for the EV newsletter.You call yourself a vape god? Wrong. You're a vape noobie if you've never had to prime your coil before. It's not that hard to do, and if you've avoided it out of shame for not knowing how, this is your redemption arc.
Let's start with the basics: you should prime your coil every single time you install a new coil or pod.
Skip this step and you're asking for a dry hit, which tastes burnt and ruins the whole experience. What's actually happening is that the cotton inside the coil isn't fully saturated yet, so when you fire the device, you're burning dry cotton instead of vaporizing e-liquid.
Worst case scenario: once that cotton is scorched, the burnt taste sticks around no matter how many times you refill. At that point, your only option is to toss the coil and start over. Priming is super important, and avoiding common mistakes will save you a lot of money.
Before we get into the how-to, let's talk about what not to do.
First, don't crank your device to a high wattage right away. Even if you primed correctly, starting too hot can still burn the cotton before it's fully broken in.
After priming give your coil time to fully saturate, and a good rule of thumb is at least 5 to 10 minutes, depending on the coil size.
Size isn't the only factor, the amount of drops you use also determines the outcome. You don't need to drown your cotton, a few drops is enough. You want it wet, not flooded, because overdoing it can lead to leaking or gurgling later.
Finally, don't skip primer puffs. Take a few gentle pulls without firing the device to help draw e-liquid into the cotton, it's a small step that makes a big difference.
Now that you know what not to do, here's how to actually do it right:
Priming a rebuildable is a whole different beast, with an RTA or RDA, you are the one building the coil and wicking the cotton. Which means you can screw it up in ways that have nothing to do with priming drops.
Pro tip: don't stuff more cotton into your coil than needed. It's a very common mistake as people think more cotton means more juice holding capacity, but that's not how it works. If the cotton is too tight inside the coil, it can't expand properly. And if it can't expand then it can't wick. The e-liquid has nowhere to go, so you end up with dry hits even though your cotton looks soaked on the ends. You've essentially choked the coil from the inside.
The cotton should move freely through the coil with just a little bit of resistance. If you have to yank it or if the coil deforms while pulling the cotton through, it's too much.
In an RTA, your cotton tails need to just touch the bottom of the juice wells. If they're bunched up or folded over, the juice can't flow up into the coil. It's like trying to drink a thick milkshake through a straw that's pressed flat against the bottom of the cup. Trim your cotton tails so they lightly rest on the deck, not jammed down into it.
For RDAs, the game is simple because you're dripping directly onto the coil. After you build and wick, saturate the cotton completely before you even put the cap on. Drip until the cotton looks fully wet, then give it one more drop. Let it sit for maybe a minute, then take a few unpowered puffs. You'll hear a slight crackle which is the sound of juice settling in. Then start at a low wattage and work your way up just like you would with a stock coil.
It's not complicated, and the process is even simpler for refillable pods.
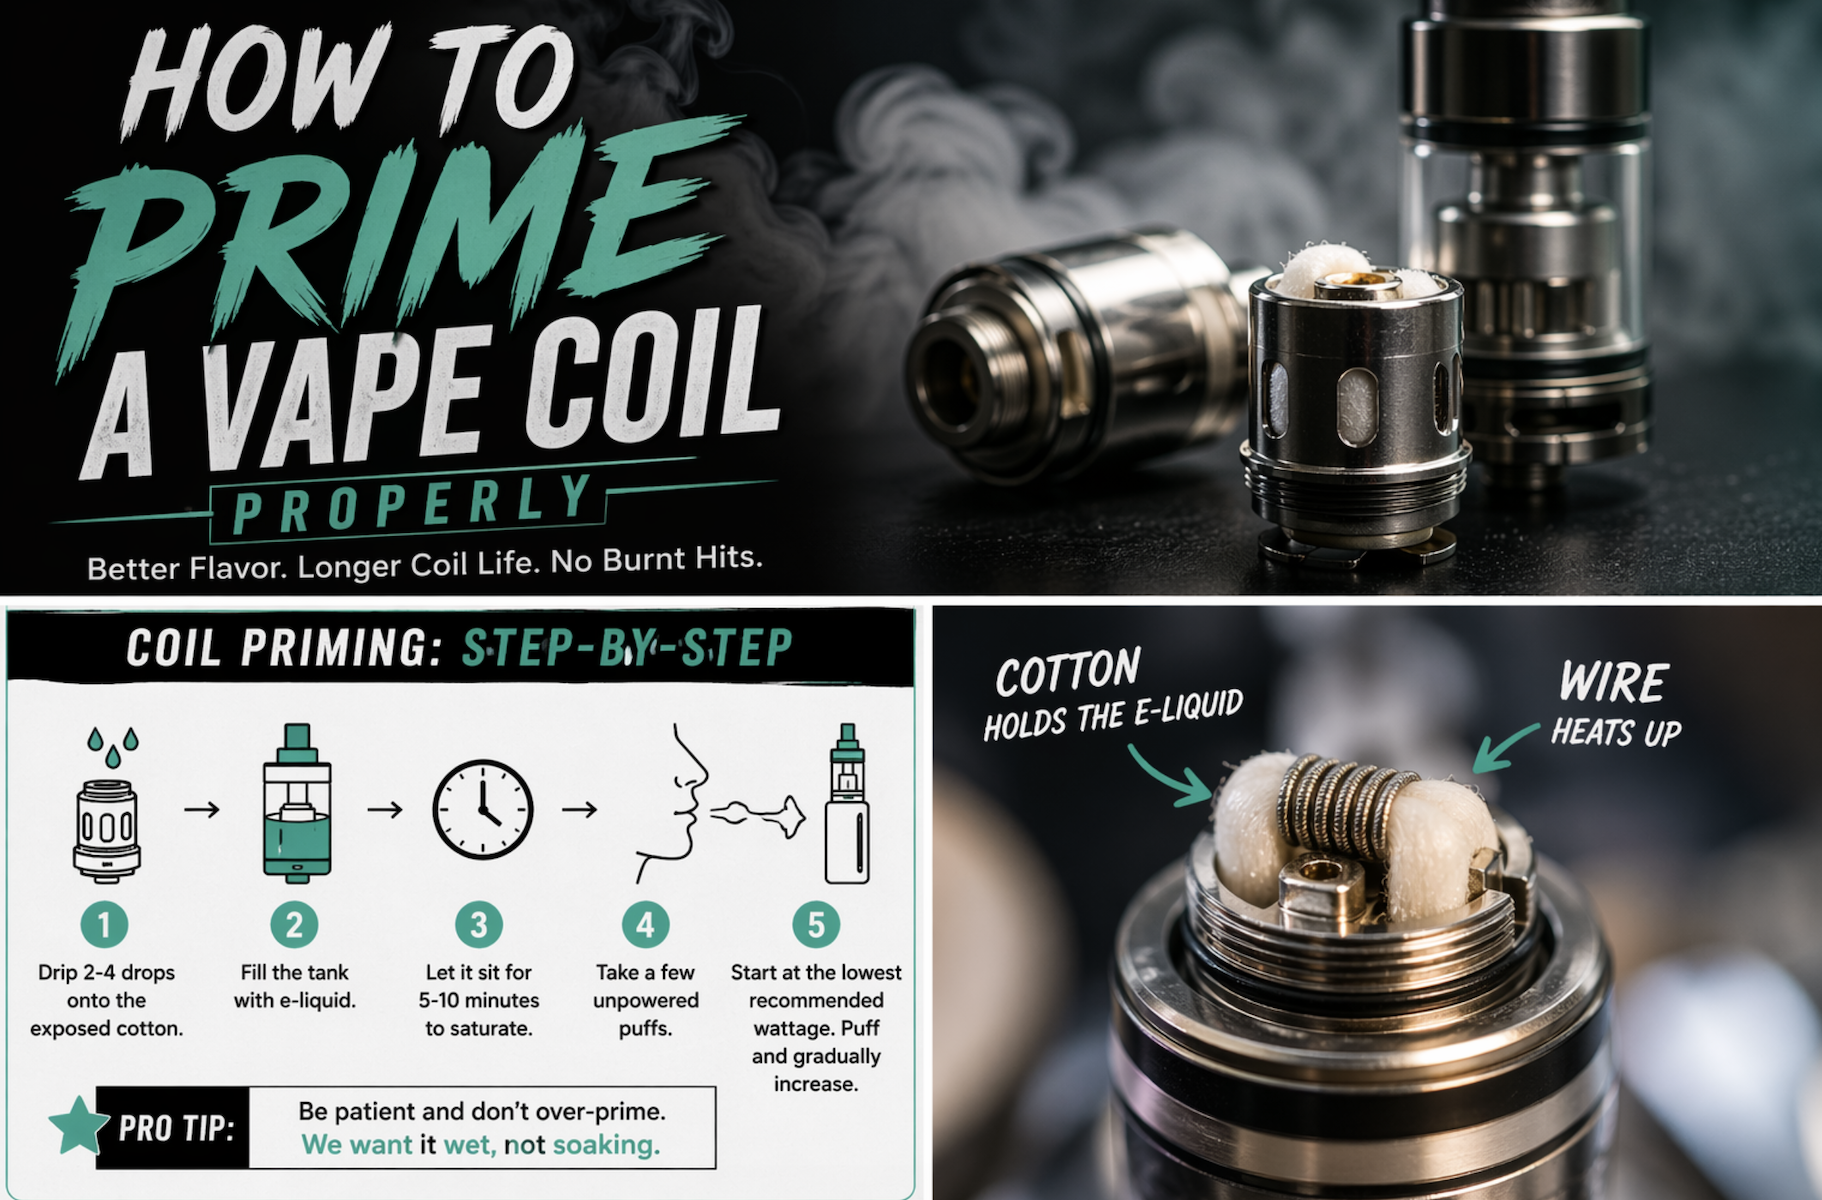
Same concept as a tank, but with fewer steps. However, to do this properly, it helps to understand how your coil works.
Every coil has two main parts: a wire that heats up, and cotton that holds the e-liquid. When you fire your device, the wire heats up and vaporizes the liquid stored in the cotton.
Every coil also has a resistance (measured in ohms), but no matter the resistance, the cotton will burn if not properly saturated. A good prime before use will help your coil last about one to two weeks.
Several things can shorten that lifespan. Sweet or heavily flavored e-liquids burn like any other liquid but leave more residue, creating a burnt sugar taste as the coil dies. Chain vaping doesn't give the coil time to re-saturate between puffs. And the higher your wattage, the faster you'll run through your coil.
A fully burnt hit is the final warning, but your coil usually drops hints before that.
Muted flavor is often the first sign. You might also notice slower ramp-up speed, darker juice in the tank, or crackling and popping sounds when you hit your device. You can push a coil past this point if you don't mind declining flavor, but if you care about taste, it's probably time to swap it out.
The type of e-liquid you use affects priming and performance, and using nicotine salts versus freebase will greatly affect cotton absorption. For more details on choosing the right e-liquid check out our blog on nic salts, freebase, and nixodine.
Nicotine salt e-liquids are typically thinner (higher PG), so they absorb into cotton a bit faster, but they can also flood a coil more easily if you over-prime. Freebase e-liquids are often thicker (higher VG) and may take slightly longer to fully saturate. Either way, the rule stays the same: prime with a few drops and don't overdo it.
Now that you've got priming down, it's worth looking at how different coil brands and designs behave, because not all coils perform or prime exactly the same.
SMOK coils are notorious for burning fast and leaking because of their dense cotton packing and small wicking ports. Adopt this special SMOK priming method for best results.
SMOK-specific rules:
GeekVape's Z Series coils (used in the Zeus, Aegis, and many other tanks) use mesh heating elements and organic cotton with larger wicking ports. That means liquid moves faster, and there are fewer hot spots to burn dry cotton. The cotton is much less dense than SMOK, and capillary action works quicker.
GeekVape Z priming method:
To stay up-to-date on GeekVape's coil compatibility make sure to check out GeekVape Coil Compatibility Guide: Q, Z, B, M & P Series Explained (2025) for more information.
With pod systems, you can't actually see the cotton. Most refillable pods have no visible wicking holes. The cotton is hidden inside the pod's coil head or integrated directly into the pod itself.
Without exposed cotton, you can't drip directly onto the wick. Instead, you rely entirely on soak time and unpowered puffs.
Universal pod priming method:
Most pod systems have fixed wattage, so just start with gentle puffs for the first few hits. If yours has adjustable wattage, start low and slowly ramp up.
Pro tip for pods with replaceable coils (not disposable pods):
Some pods (like the original Caliburn) have a replaceable coil inside a reusable pod. For those, you can see the wicking holes. Use the standard 2–3 drops method before inserting the coil into the pod, then fill and wait 10 minutes. Best of both worlds.
Priming a coil properly shouldn't be scary. Now you know that a few drops and some unpowered puffs go a long way. You have the potential to be a vape god. Just remember: practice makes perfect.
Keep lightly puffing away until you find your sweet spot, noobie.
And if you accidentally burn through your cotton on your first few go-arounds, Element Vape has you covered for all your coil and vaping needs.
0 Comment
Latest